Tag: Visual edit |
Tag: Visual edit |
||
| Line 221: | Line 221: | ||
==See Also== |
==See Also== |
||
* [[Character Builds]] |
* [[Character Builds]] |
||
| + | *[[Build:Wizard Slayer]] |
||
[[Category:Character Builds]] |
[[Category:Character Builds]] |
||
Revision as of 05:50, 21 January 2021
There's no turning back is a Character Build in Outward, created by Lorefashj.
Summary
-
There's no turning back This reckless Seeker is built around Moment of Truth, the 2h-sword exclusive master skill. With full buffs, Truth Seeker can eliminate most arena boss within 1-2 mins and one-shot most standard enemies.  Breakthroughs
 Required Faction 


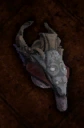
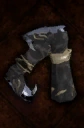
Equipment Weapon Off-Hand Head Body Boots Backpack Any


-
Quickslots 1 2 3 4 5 6 7 8


Full Build Details
This is a glass-cannon, pls play with patience since your will suffer -70 resistance in most time. Dump normal/Special attacks completely once reach Caldera, Tsar Claymore is too clumsy which means dangerous. if you really need that tiny dmg, use Probe. However, Level 4 Alertness Probe is way too clumsy, please use Mana Ward and eat blank dmg to deliberately lower Alertness level.
Heroic Kingdom is mandatory, since you'll get 30% physical dmg boost and additional 25 hp to help you survive
SPECIALIST: Brawns and Patience to greatly increase Moment of Truth dmg(Co-op or Split-screen).
Only invest 1 point to unlock mana (40 mana in total with Peacemaker, surplus)
Guides:
If you can get Moment of Truth in early game by split-screen or co-op, you will find this game really joyful....dont worry if inaccessible, the following guide will assume this is a blank play through.
2.Very Early Game
Travel to Antique Plateau immediately once freed from blood-price, clear that Bandit Hideout in east map to get Elemental Particle-Light asap.
Enchant your Iron Claymore with Unsuspected Strength. If that Arcane element didn't drop particle, delete the most recent save and try again.
3.Breakthrough by priority
Steadfast Ascetic (Perfect Strike & Counter Strike) -- Daredevil (Anticipation) -- Shamanic Resonance (Infuse Wind)
i.Perfect Strike for solid AOE Pain infliction and good raw damage, especially in Electric Lab Arena and alike. Set up 2 stacks Alertness for Pain is way too slow.
ii.Counter Strike and Pommel Counter for dire situations(For those invincible frame mostly) and for Probe preparation, also good dmg and Confusion source in early-mid game.
iii.Or replace Daredevil with Leyline Connection (Fire Affinity), mana regeneration = spontaneous Mana Ward and better life quality.
4.Enchantment
Helmet: Barrier (Calm Soul? I sincerely hope it will help set -70 resistance to 0, but nah)
Armor: Barrier or Sang Froid ( -70 Fire Resistance Burning, Surprise!)
Boot: Barrier or Flux , yr choice
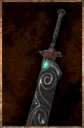
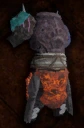
5.Why Tsar Claymore & Slayer Set
Tsar Claymore: Best Physical Sword
Slayer Set: Easy to craft, Physical dmg boost and gorgeous status effect resistance, 'cz DoTs are devastating when you have -70 resistance
You can replace with Hound Mask or Shadow Kazite Light Armor (Assassin)~
Arena Boss:
Preface: The following guide is base on this very build ONLY, there're indeed easier way to deal with bosses like grenades or 100% resist equipment
Rating: 1 to 5 weak to strong
Abbr: Moment of Truth (MoT), Mana Ward (MW)
1.Caldera
i.Grandmother (R2): Pain them, One shot Mage first. Resurrection wont remove Pain, so...
ii.Elite Torcrab (R3): Boss = 2.5 MoT, MW + MoT is your best friend
iii.Elite Gargoyles(R4): R4 for that expensive arena ticket, R3 for Gargoyle Mage(try staying close, it will use melee more likely), R2 for the rest
iv.Elite Crimson Avatar(R5): Strongest Boss in every sense, take its low impact as advantage. MW + MoT when it casts floating mines, counter its second beam or that leap+melee combo, Boss = 9~10 MoT
i.Troglodyte Queen(R1): Well...Alright...
ii.Brand Squire(R1): MoT after his Perfect Strike
iii.Elite Mantis Shrimp(R2): Just an more aggressive shrimp, counter or MoT when you see fit
3.Abrassar
i.Elite Crescent Sharks(R4): Drat.. Keep them in front of you and backwards along the edge, MW+MoT after their lunge, becareful of mines and MW them if too many
ii.Calixa (R3): Very easy to counter and vulnerable to both Pain and Confusion, just stay in mid range and mind her rush attack , wont be a big problem
iii.Elite Beast Golem(R2):Simply block its pounce and MoT
i.Ash Giant Highmonk(R2): Stay right next to it so you wont get hit by floating mines, if caught in cloud simply move away and repeat
ii.Elite Ash Giants(R1): Poor Giants = Pain +2 MoT, dont forget your mana ward
iii.Elite Alpha Tuanosaur(R3): Mind that burning dot, when suffering -70% resistance, every single dot is dreadful. Keep staying next to its right leg and circling from yr left hand direction, the first attack of its melee combo will miss u completely because of the modeling.
i.Immaculate's Bird(R1): Have some mercy, will you?
ii.Elite Sublime Shell(R3):Very easy to counter, becareful of its melee+laser combo. Good MoT timing when it slams ground
iii.Elite Boozu(R2): Clumsy Boozu, keep circling to its rear part and MoT, also a good counter practise target
i.Light Mender and Plague Doctor(R3): Dumb buy 1 get 1 free, stay away and MT + Mot in-between their spells. If they are really trouble for you, simple put on Entomber Set + boons + Resistance Potion to achieve 100% lightning and decay resistance, dont MoT if play in this way.
ii.Elite Burning Man(R3): Mana Ward OP, MW really shines in this battle. Stay close to avoid fireballs and MoT burning man first.
iii. Immaculate (R4): R4 for that poison entrance requirement, keep circling counter-clockwise(from yr right hand direction) to avoid Ethereal shockwave. Block/dodge its melee and MoT
Combos
| Weak Enemies | |||||
|---|---|---|---|---|---|
 > >  | |||||
| Less Strong Enemies | |||||
|---|---|---|---|---|---|
>  > >  > > | |||||
| Elite Enemies | |||||
|---|---|---|---|---|---|
 > >  > > > >  > > > > > > | |||||
| Arena Boss | |||||
|---|---|---|---|---|---|
 > >  > >  > >  > > > >  > > > > > > > > > > | |||||